Who said that electricity and water don’t mix? In part 1 of this series, we covered the theory and science behind how electrolysis works. In this article, we get to go and actually build something.
As with many things in life there is more than one way to do it, so if you have a better way to do something, by all means, do it. And share, because there isn’t any point in keeping that knowledge to yourself, and I like to learn.
What follows in this article is my build log of a moderately sized and modestly priced electrolysis tank. I’ll link to the various parts that I used during my build. Feel free to substitute as needed with parts you prefer or already have.
Design Principles
Similar to the Lye tank we built in part 2, the ‘three Ss’ (Strength, Size, and Safety) apply when building an electrolysis tank. Now, please allow me to gratuitously copy/paste from our previous article and make small modification:
- Strength – The electrolysis tank should be strong enough to support the full weight of water and pans it will hold. Water is very heavy at 8 pounds per gallon. A 20 gallon electrolysis tank weighs roughly 160 pounds in water weight alone. When acquiring this vessel, ensure it is strong enough to support this weight. Rain barrels & heavy duty buckets work well here. Light duty plastic bins such as those sold for clothing storage are not.
- Size – The electrolysis tank should have sufficient capacity to support the largest item you’ll be restoring.
- Safety – The electrolysis tank should be easily secured so that it is not a hazard to others. The electrolyte in an electrolysis tank is no where near as bad for you as a lye solution, but I’d still ensure that your pets don’t drink the water
Safety and Personal Protective Equipment
The byproduct of this process is elemental hydrogen (H₂) & Oxygen (O₂). It is important that your electrolysis tank has adequate ventilation to ensure these gases are not contained in an enclosed space. Use your electrolysis tank outdoors or in a garage with the doors open. With this in mind, it bears repeating that the area around the electrolysis tank is a no-smoking zone.
Think about the location of your electrolysis tank prior to filling it with tens or hundreds of pounds of water. It will be a pain to move it later.
Also, we are working with water and electricity in close proximity, so make sure your power source is plugged into an outlet equipped with a Ground Fault Circuit Interrupter (GFCI).
Lastly, when making changes to the electrolysis tank, ALWAYS do this with the charger unplugged. It does not take a great deal of electricity to severely hurt or kill a person.
Parts
The Vessel
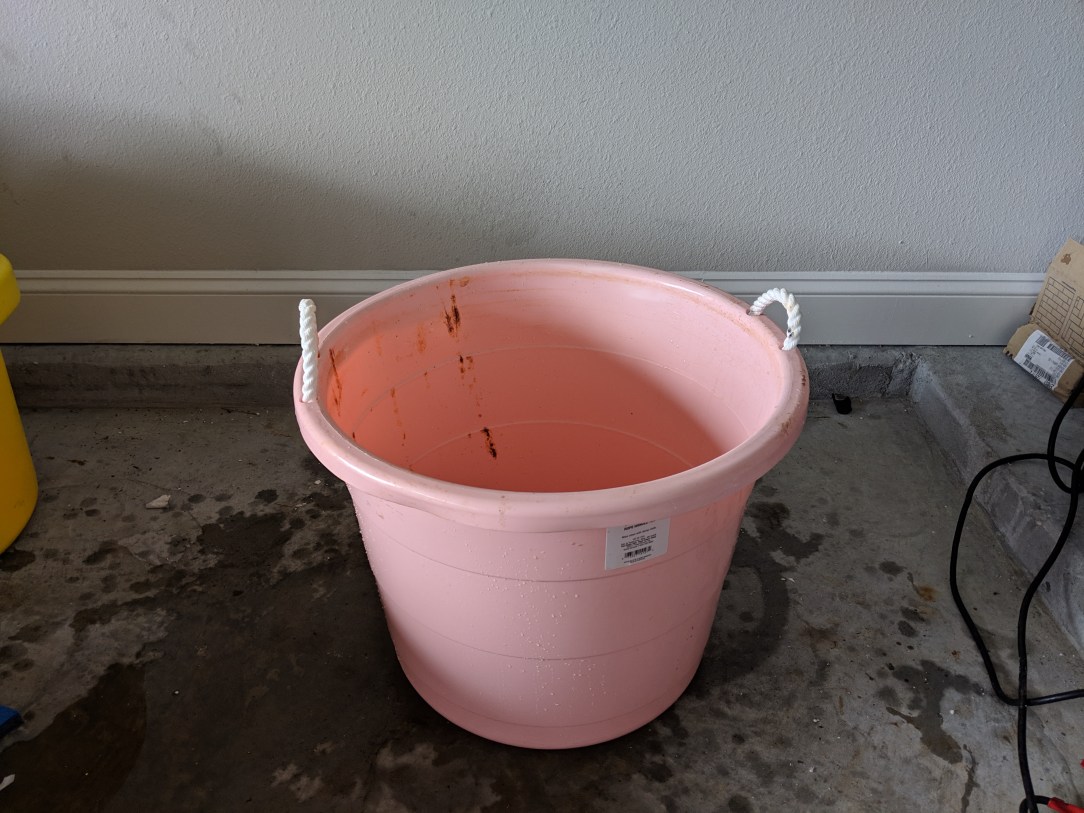
Using the principles above, a vessel which can hold 10 to 20 gallons of water is a good starting size that you wont immediately outgrow. When I originally started out with electrolysis, I used the old home repair stalwart, the Home Depot Homer bucket. and I quickly realized that a 5 gallon bucket is way too small for any reasonably size cast iron pan or dutch oven.
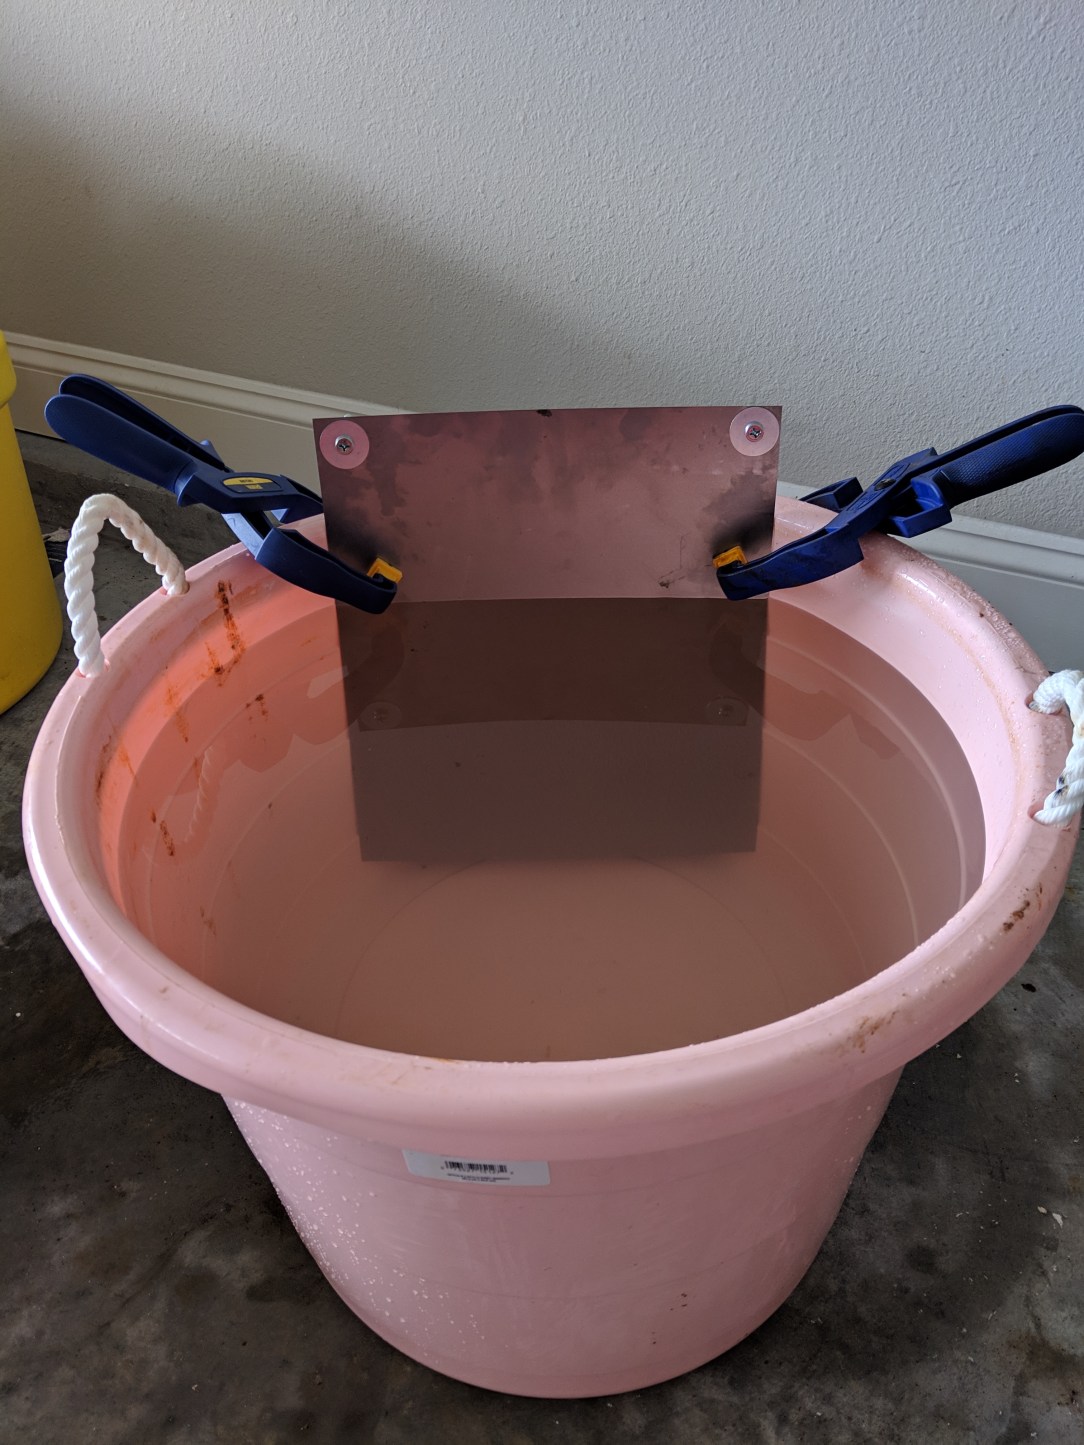
Ultimately I ended up settling on this vessel, from Target, as it was cheap enough and has decent capacity (~17 gallons). My local Target only seemed to have it in pink, but that’s OK, because real men wear pink.
Scrap Metal
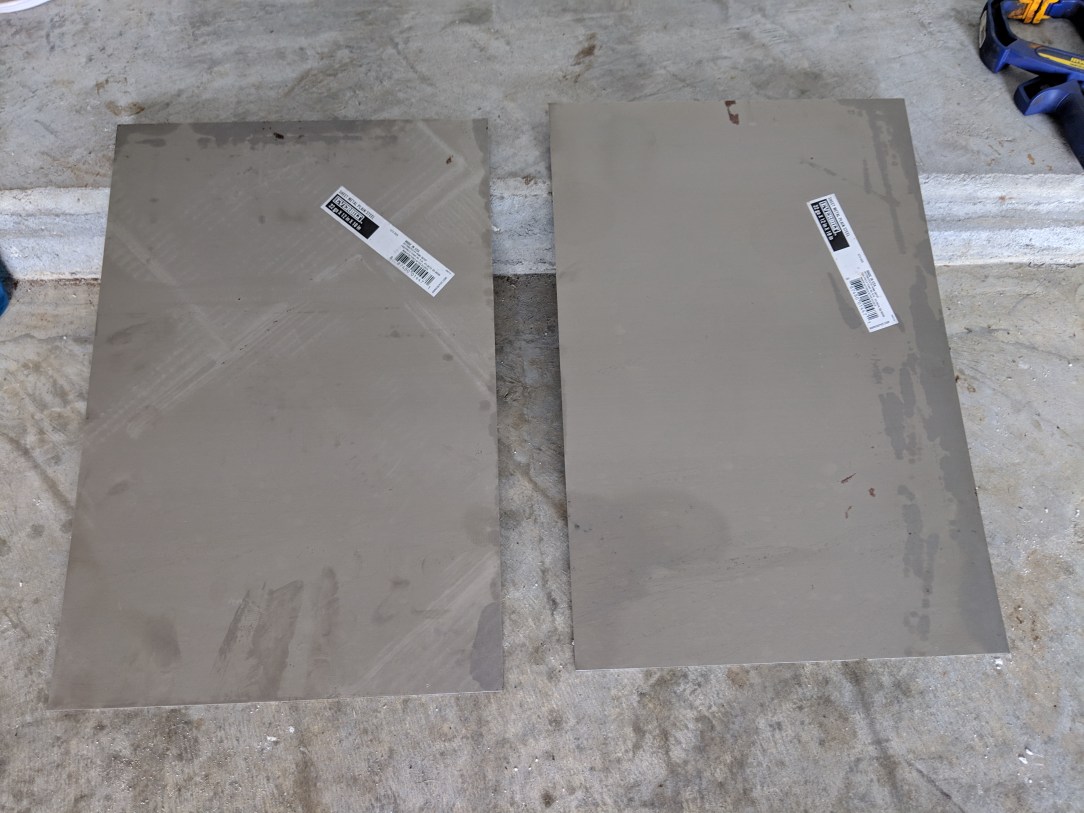
We need scrap metal to serve as the sacrificial anode. Any piece of plain steel will work such as rebar or in a pinch, solid steel baking sheets. Non magnetic stainless steel also works, but I have seen much debate as to whether it is safe to use or not. In the interest of playing it (potentially overly) safe, I don’t use stainless steel.
I found 12×18 sheets of plain steel for low cost.
Clamps
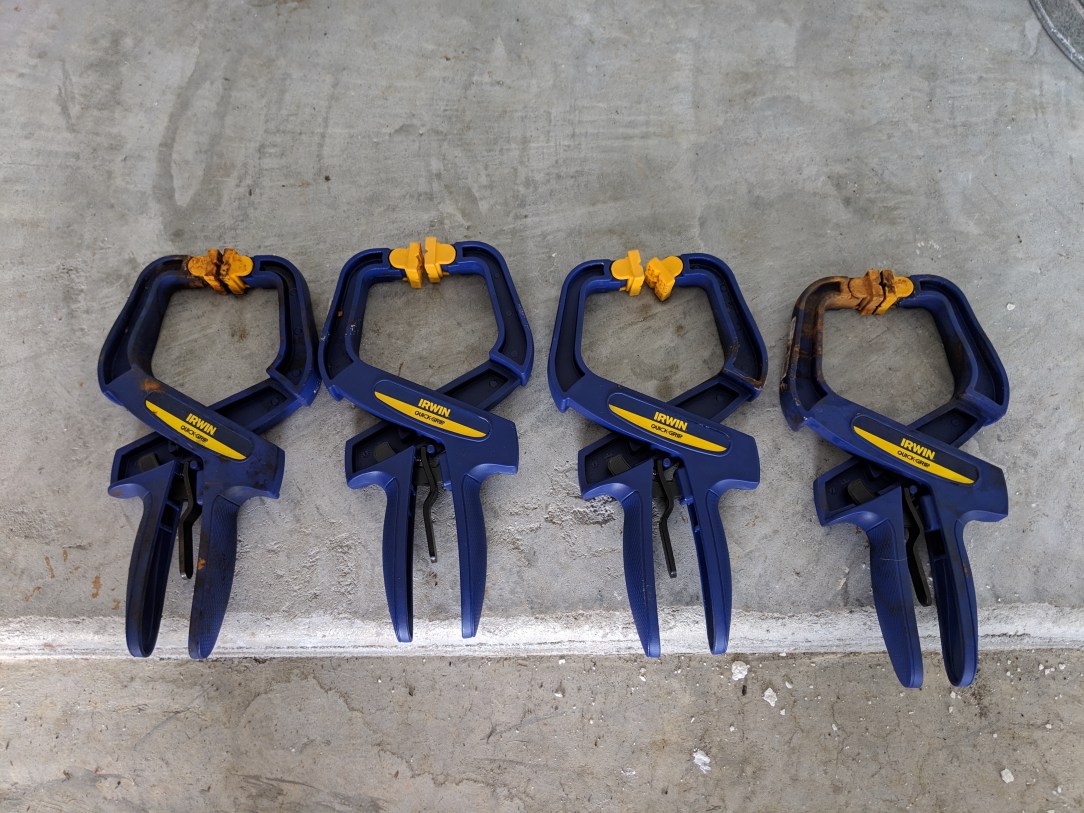
Clamps are useful to hold the anodes to the sides of the tank. For this build, you need a minimum of 2 clamps. I choose to use 4 because I am paranoid about items moving around. The anodes are a consumable item, so they’ll need to be easily changed out. Clamps with quick release triggers are perfect in this usage as they make it easy to change out parts while still actually securing the items. I use these
Power Source
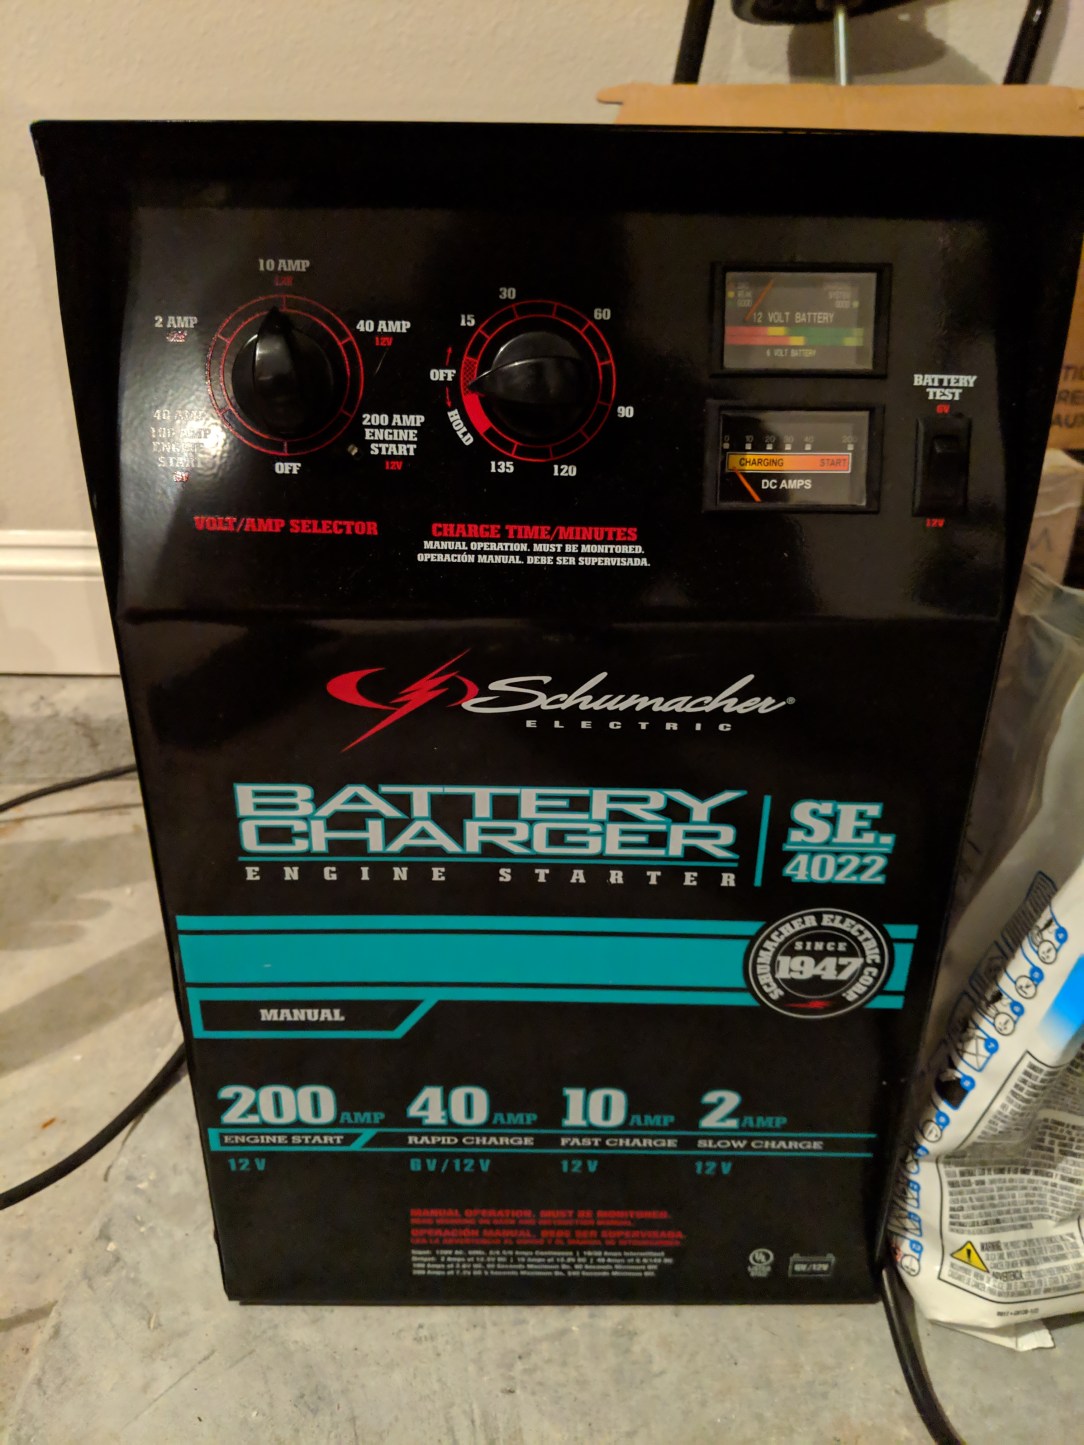
This is the most expensive part. Get a MANUAL battery charger such as this. Battery chargers come in both manual and automatic variety, the difference being a feature that turns the charger off when a battery is full. For our application, you MUST get a manual charger as the electrolysis tank will present itself as a charged battery, and automatic chargers will turn off (thinking that it no longer needs to charge a battery).
For this build, I am using an existing charger that I have, a Schumacher SE-4022 2/10/40/200 Amp Manual Wheeled Battery Charger and Tester,
Screws, washers, and bolts.
Screws, washers, and bolts are needed to that we can securely connect the steel plates to our sources of electricity. I purchased these machines screws with bolts, and these steel washers.
Note: I ended up not using the screws in the blue package. I bought them for backup, but ultimately ended up not needing them.


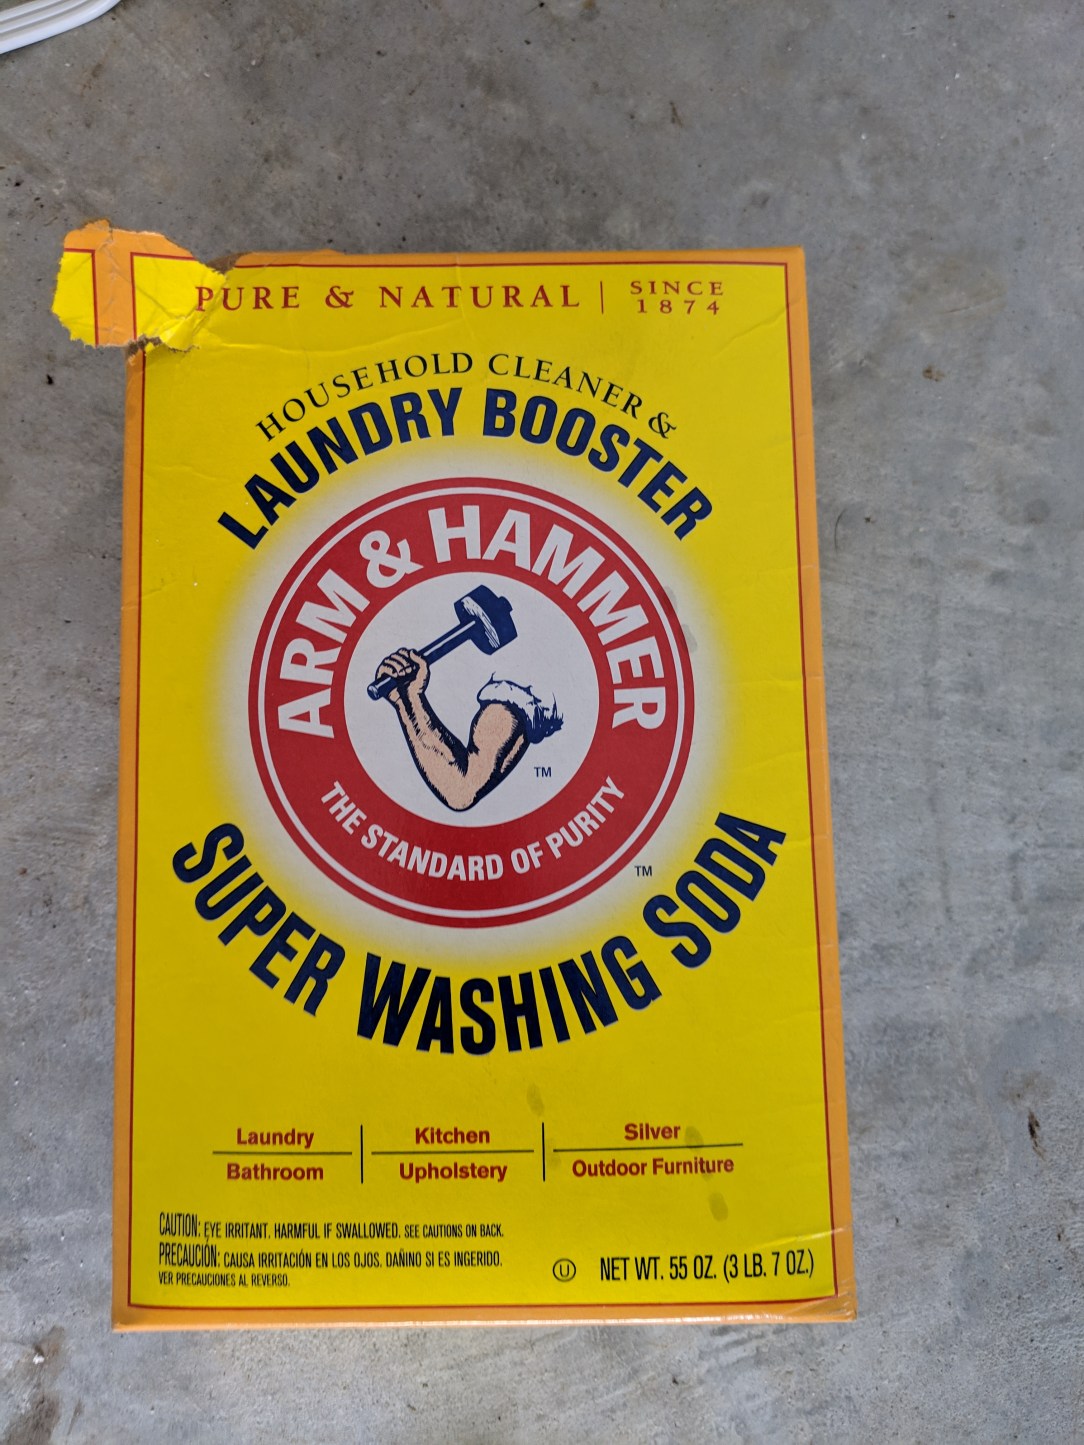
Washing Soda
Washing soda (aka Sodium Carbonate (Na₂CO₃) is the electrolyte of choice for cast iron electrolysis. Washing soda is used as a component of laundry detergent, and can be found in retail stores in the laundry supplies aisle. It is not to be confused with its close cousin, baking soda (aka Sodium Bicarbonate (NaHCO₃)).
PRO-TIP: using the power of heat, we can convert baking soda to washing soda. This can be useful if you cannot find washing soda via your retailer of choice, or if you just happen to have extra baking soda laying around (such as the baking soda from your refrigerator that you used to absorb odors). You perform the conversion by taking the baking soda, and spreading it thinly on a baking sheet, and baking it at 400 degrees Fahrenheit for about an half-hour, stirring it once or twice during the process. Heat forces Sodium Bicarbonate (NaHCO₃) to shed Carbon Dioxide (CO₂) and Water (H₂O).
I use Arm and Hammer Washing Soda
Jumper Cables
To connect the two steel plates, so that electrolysis can be performed on both sides of the pan, we need conductive wire. Jumper cables are a very low cost means to solve this problem. Jumper cables are copper (an excellent conductor) and can handle high amounts of DC Amperage (such as the current from a DC battery charger)
Final parts list
| Item | Link | Quantity | Price | Subtotal |
| Plastic Storage Bin with Woven Handles | LINK | 1 | 7.99 | 7.99 |
| Everbilt 12×18 22 Gauge Plain Steel Sheets | LINK | 2 | 7.99 | 15.98 |
| IRWIN QUICK-GRIP Handi-Clamp, 4″ | LINK | 4 | 7.99 | 31.96 |
| Schumacher 10 AMP charger | LINK | 1 | 38.82 | 38.82 |
| Machine Screws | LINK | 1 | 1.18 | 1.18 |
| Washers | LINK | 1 | 1.18 | 1.18 |
| Washing Soda | LINK | 1 | 4.12 | 4.12 |
| Jumper Cables | LINK | 1 | 10.49 | 10.49 |
| Total | 111.72 |
Assembly
Tools Required
To assemble the electrolysis tank, we need a couple of simple tools. Firstly, we’d need a drill & 3/8″ drill bit, as we’ll need to drill holes in the steel plates. And we’ll need a screwdriver and an adjustable wrench, which will be used to affix the screws and washers to the steel plates.
Let’s Build
Firstly, we’ll need to fill the bucket with water and washing soda. The ratio that is used is 1/2 cup of washing soda for every 5 gallons of water. As this is a 17 gallon tank, I used 1 3/4 cups of washing soda. Note: this ratio doesn’t have to be perfect like a baking recipe, but don’t go drastically overboard either. Washing soda is pretty coarse, so you may want to use a stick or whisk to make sure it is all dissolved. Fill the tank as high as you possibly can, factoring in that whatever you add to the tank will displace water.
Next, towards the top right corner of the first sheet of metal, drill a 3/8″ hole. Repeat this on the left side as well.
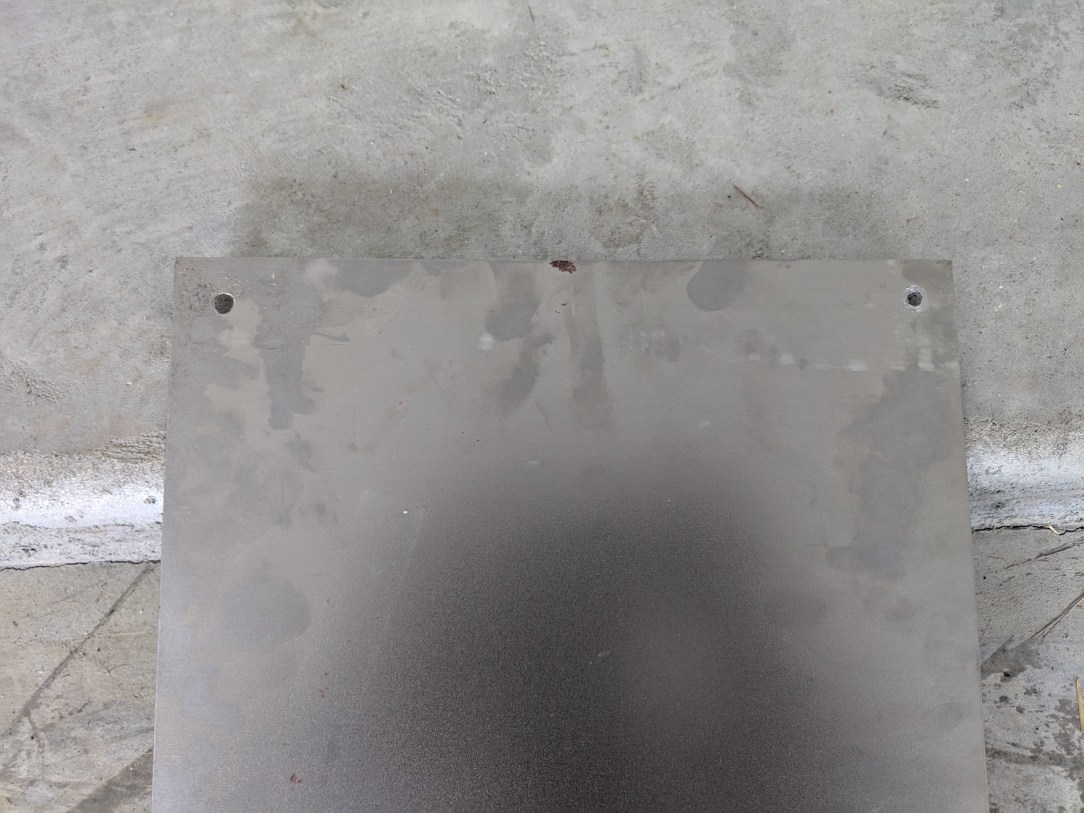
Next, on the second sheet of metal, drill a 3/8″ hole in the top left corner.

Next, insert the screws, washers, and bolts into the 3/8″ inch hole in the following order: Screw -> Washer -> Steel plate -> Washer -> bolt. Secure these tightly using a screwdriver and the adjustable wrench
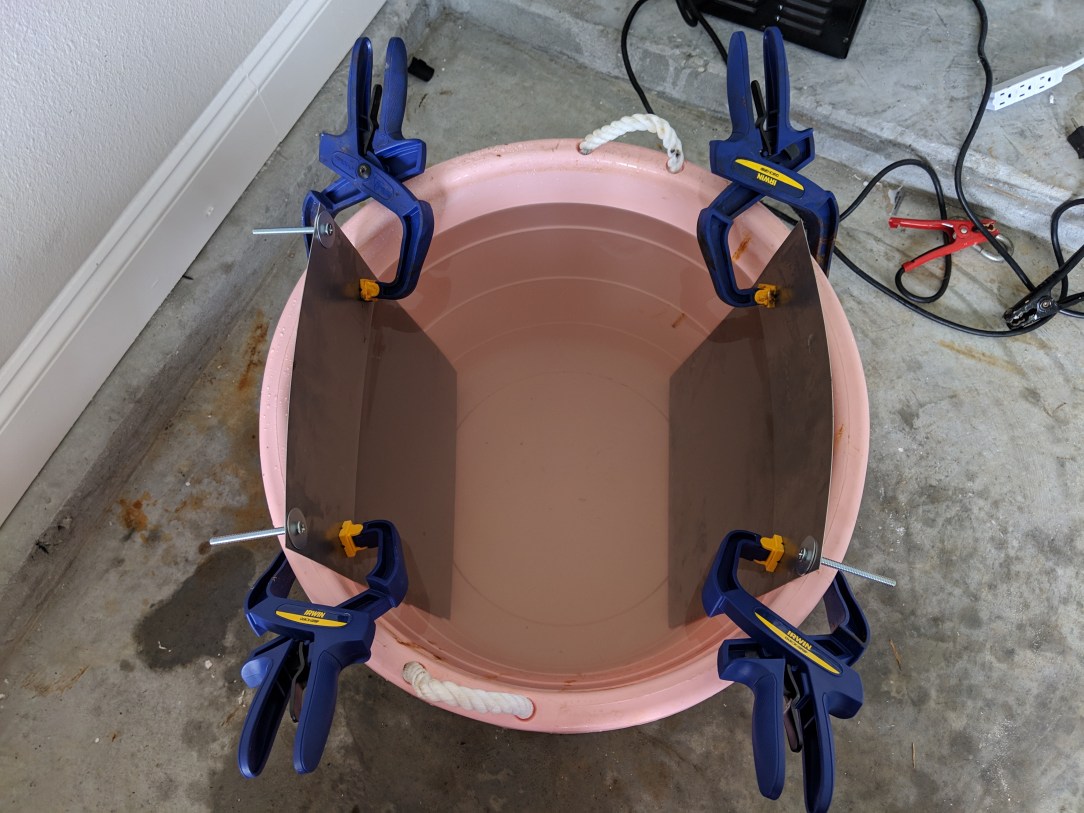
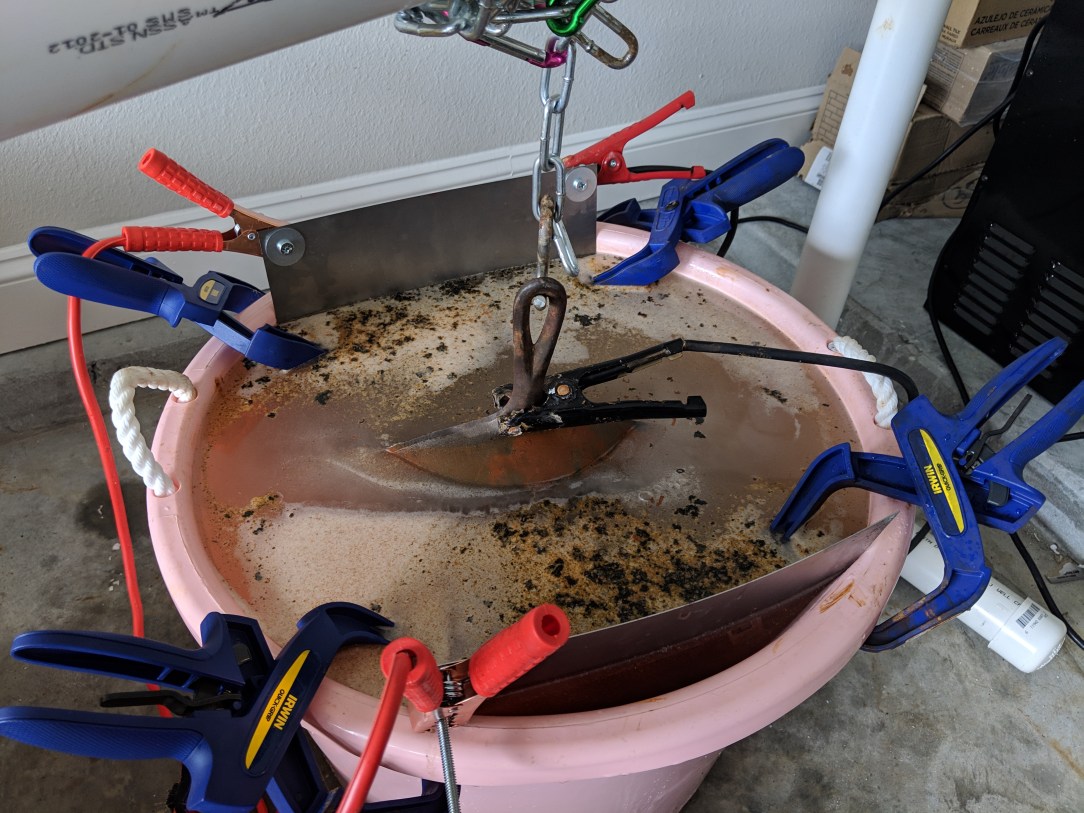
Now that you have the steel plates ready, insert the steel plate with the two screws into the tank and clamp it in place as close to the battery charger as possible and with the screws facing outward. This plate has two screws so that we can connect it to both the charger and the second plate.
Next, insert the second plate (the one with only one screw) into the tank on the exact opposite side of the tank.
Now we need to suspend our pan parallel to our steel plates without touching. You can use a 2×4 which is wide enough to span the tank, and suspend the pan using wire.
I prefer to use a homemade ‘gantry’ made of PVC pipe and pipe fittings.
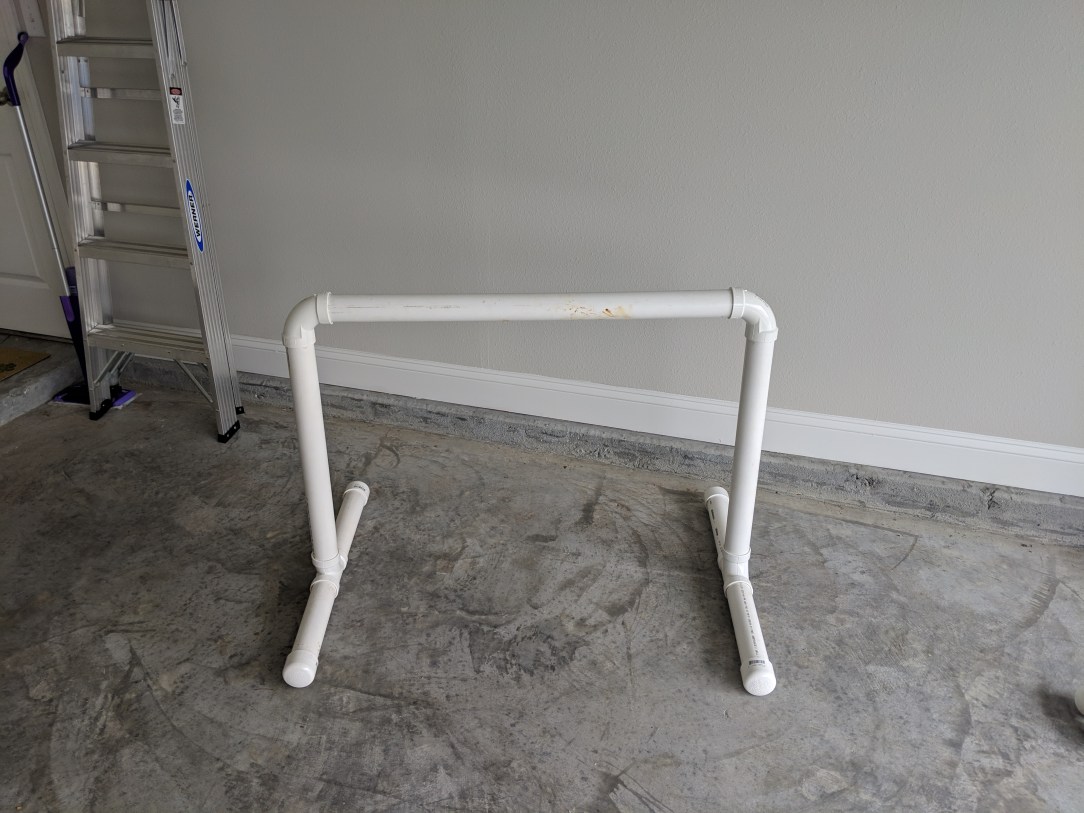
This setup allows me to move the item that I am working on independently from the electrolysis tank. Plus, it makes it easier to adjust the height of the item.
Our Pan
Let’s take a look at our pan. As you can see, this pan is pretty rusty, and is an ideal candidate for electrolysis.
Let’s get it suspended from the gantry and positioned so that we can start removing this rust.
Note: This pan is taller than my tank. Generally, you’d want a tank deep enough so that you can fully submerge the pan and completely clean it in one pass. But this pan is HUGE, so I am going to violate my own rule. This means that I’ll need to invert the pan in the tank and run a second pass so that electrolysis can be performed on the parts that are currently exposed.
Hooking up the power
Firstly, ensure that the battery charger is unplugged. Next, connect the negative (black) lead from the battery charger directly to the pan. Now, connect the positive lead from the battery charger to the first screw on the first steel plate.
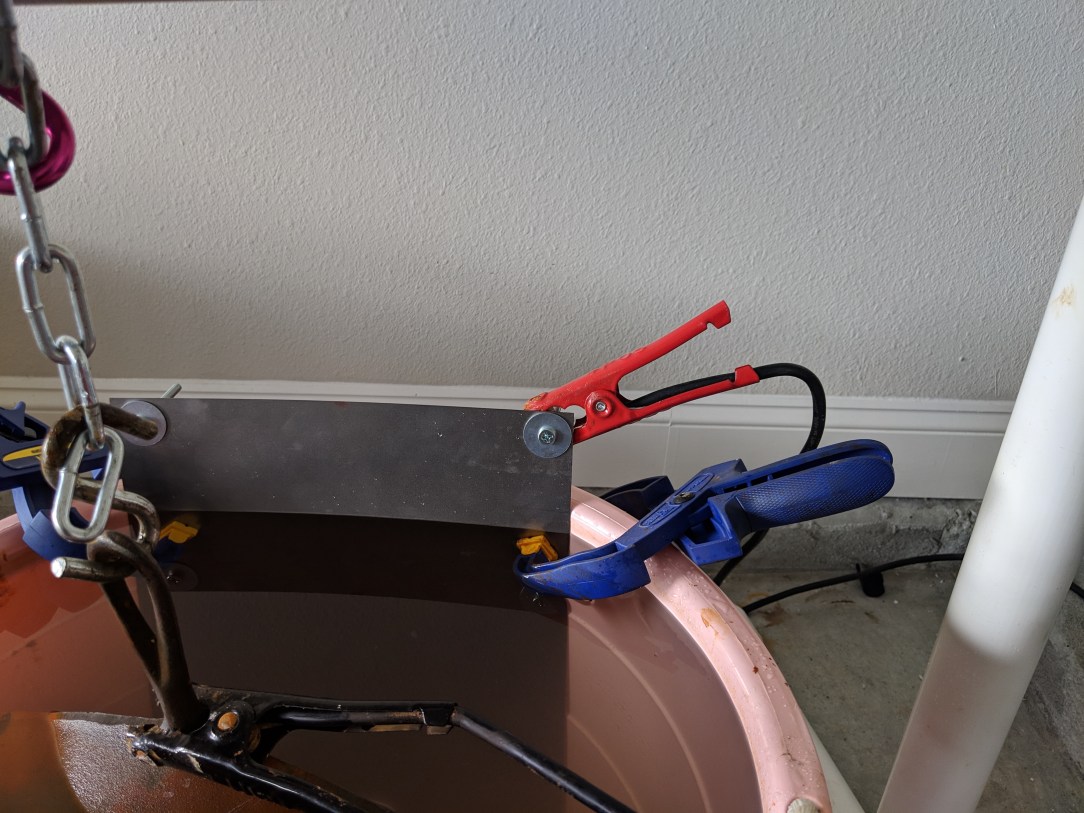
Next, using a jumper cable, connect one end of the jumper cable to the second screw on the first plate. And connect the other end of the jumper cable to the screw on the second plate. This will allow electricity to flow from the first plate to the second.
Note: we do not reconnect the second plate back to the first. Basically, we don’t want to have a loop. This is also why the second plate has only 1 screw.
Now at this point, we are ready to fire up the electrolysis tank. Plug in your battery charger, set your voltage & current (either 2Amps@12V or 10amps@12V are good), and turn on your charger.
Assuming you have your connections setup properly, you will begin to see bubbles along the edge of both the pan and the anodes. These lovely little bubbles are your confirmation that the process is running.

At this point, the pan is successfully being derusted. Electrolysis will take between 2 and 24 hours depending on the pan, how cruddy it is, and the size of your charger. Go enjoy your secondary hobbies, and check back on it periodically until it is cleaned to your liking.
As an example, here is the pan after merely 10-15 minutes of electrolysis:
…and after 90 minutes:
Still pictures do not do electrolysis any justice. Listed below is video of electrolysis in action on this pan.
Conclusion
Hopefully this article has demystified the science and practicality behind the electrolysis process, and has given you some ideas as to how to construct your own.

1 comments on “Restoring Cast Iron Pans part 3: Building an electrolysis tank”