alternative title: “The Hater’s guide to frying a turkey”™
Well, it’s that time of year when we watch, laugh, and snicker at those poor souls who attempted to deep-fry a turkey and ended up burning up their turkey, or worse their house…
And despite the gallows humor of seeing a homeowner imitate Werner Von Braun by trying to launch a turkey into orbit, fried turkey can be made safely and reliably without having to file an insurance claim. This article will hopefully provide some guidance to how you can deep fry a turkey without…you know….dying.
Why should you make a fried turkey?
Why not? Seriously. A turkey is conceptually just a “big ole chicken”, and we like fried chicken, so fried turkey isn’t completely off-kilter. A hidden set of benefits of frying a turkey are the following:
- You free up your oven so that it can be used for other stuff. There was once a time where I didn’t have the equivalent of 4 ovens to cook with. (a double-oven, a microwave with oven functionality, and an electric smoker that’s dedicated solely as a warming oven), and being able to move the turkey out of the oven to ‘somewhere else’™ is valuable. Granted, this doesn’t have to be a fried turkey. Smoked turkeys cooked on the BBQ pit of your choosing also frees up your oven. But both of these options mean that you can parallelize your cooking and ideally NOT have to wake up so early to start cooking.
- Cooking time. Fried turkey takes about 3-4 minutes per pound to cook. That speed in cooking means that you could cook a turkey in a bit under an hour. Heck, you can cook 2-3 in the time it takes to oven roast or smoke 1. For a 2PM dinner, I usually fire up my fryer at 1220-1230, aim to get the bird in at 1300 and out at 1345-1400 with a 15 minute rest before cutting & serving. That’s…..fast.
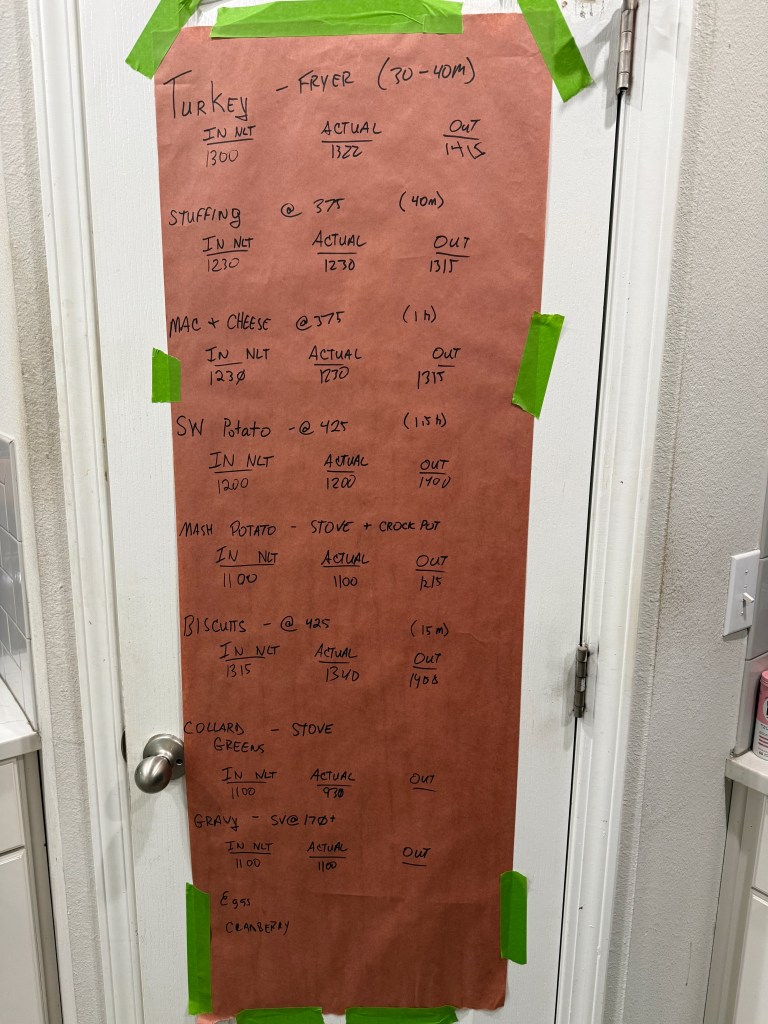
Side-tangent: The buddy board.
Going a little off-topic. Getting all the items scheduled to get into their cooking vessels requires a bit of planning and you got a lot going on. It is really really easy to leave a major dish in the fridge because you forgot that you multitasking and/or drinking. Ask me how do I know this?
I use a simple sheet of butcher paper, taped to a door, to plan all of the oven buddies (dishes that need to cook at similar temperatures) and when they need to go in. I HIGHLY recommend it.
Where do most folks go wrong?
The Daily Show did a video a few years back showing many of the challenges that folks have run into attempting to fry turkeys.
What should I do?
Frying a turkey isn’t hard, but requires some planning. In each of these cases, the users neglected critical safety measures. My safety checklist, which under NO circumstances do you deviate from, for frying a turkey is the following:
- Always fry the turkey away from structures or anything flammable.
- Once the oil is up to the temperature you wish to fry at, turn off the flame while lowering the turkey in. Then only after the turkey is in, do you turn the flame back on.
- Slowly, and I mean, SLOWLY lower said turkey into the oil.
- Ensure that the vessel in which you are cooking the turkey is tall enough to account for the space the turkey takes, the amount of oil that the turkey will displace, and the fact that oil will bubble during the frying process. Too much oil is the most common reason for boil-overs & fires.
- Wear sufficient PPE (long gloves/mitts and/or long sleeves), as the turkey will generate a TON of steam.
- Ensure that the turkey’s skin is dry. Either pat it down with paper towels, air dry it overnight, or dust it with flour.
- Have a fire extinguisher handy.
Required Equipment
You’ll want to get a dedicated turkey fryer for this. And yes, you should get a dedicated fryer for this purpose because the components (the fryer, the pot, and the hook/basket to lower the turkey into the oil) are all designed to work with each other safely. You could “build your own kit” with a burner, a large pot, etc, but that is beyond the scope of this post. I would consider that advanced functionality that you can implement once you feel comfortable with the process. I can not be held liable for any skullduggery that you get yourself into, nor can I be held liable if your dog chooses to elope with your cat.
How big of a turkey to get?
Your turkey fryer will generally list a maximum size that you can use. My fryer (https://www.academy.com/p/outdoor-gourmet-30-qt-turkey-fryer-kit-150730869?sku=silver) lists a maximum size of an 18 lb turkey. And if we are being honest, if you need more than 18 lbs of turkey, cook two of them. This allows you to play with different preparations or flavors. Trying a turkey larger than this would be sketchy at best and likely unsafe. Most 30QT fryers are perfect for this application. Outdoor Gourmet and Loco Cookers brands are both available at the home center of your choosing or online and are inexpensive, effective, and reliable.
What type of turkey to get? And should I brine it?
Once you’ve figured out how big of a turkey to get, the next step is to actually purchase one. I generally prefer to get a natural turkey that is both unfrozen AND has NOT been brined. If I am roasting, smoking, or using a rotisserie, I generally dry-brine. I wet brine when I deep-fry a turkey. My reasoning is that for a deep-fried turkey, this is my only opportunity to introduce flavor. Injections aren’t that effective here, nor is seasoning the exterior of the bird. (Most of that flavor will burn up in the oil anyway).
One note on brining, most commercial birds are already brined, and will have a statement on the packaging along the lines of ‘’*Contains up to 8% of a solution of chicken broth, carrageenan, and sea salt.” telling you how much. You’d need to account for that if you play to brine a turkey.
I personally prefer to get an unbrined turkey so that I have complete control over the ingredients added to it. I won’t brine a commercial turkey. It’s doable, but you need to do some maths to account for the fact that the bird is already brined.
My current favorite is the “Naked Turkey” variety from Joyce Farms. It’s a good quality bird that I can reliably source from my local butcher. And while Heritage Turkeys are awesome, a lot of their value is lost with the frying method. Reserve those birds for smoking or roasting OR when you went to embrace your inner Bob Belcher.

You want the “Buffalo Trace” of turkeys:
- Good enough that you aren’t ashamed of serving it
- Cheap enough that you aren’t being wasteful by frying it.

Equipment Check
Gather up all of the equipment that you’ll need for this adventure:
- The aforementioned turkey fryer
- 3-5 gallons of a high temperature rated oil. (Peanut, Canola, Safflower, or Sunflower oil are great here). Get this at a restaurant supply store or a warehouse store (like Costco, BJ’s, or Sam’s Club) to save a few dollars. Exactly how much oil you are going to need is dependent on the bird you pick.
- A set of LONG oven mitts/gloves. You want a set which cover your entire forearm. The process of lowering the turkey into the fryer creates a ton of steam, and you don’t want to get scalded
- A long lighter (to light the turkey fryer)
- An instant-read thermometer
- A digital thermometer with a long stem. Your fryer likely comes from analog thermometer. Its precision will be shitty at best. Throw it away. I use this thermometer as it has a 8″ stem AND has alarms, so it can warn me if/when the oil is getting hotter than I expect.
- Butcher twine (Optional)
- Fire Extinguisher
Practical Application
Ok, theory and warnings aside, let’s apply this to how I make my Thanksgiving turkey. US Thanksgiving is always on a Thursday, so my preparation starts the Monday before, roughly 72-96 hours before I’d want to actually cook the turkey.
Monday
Get the turkey from the butcher. As mentioned above, I do a Joyce Farms Naked turkey (https://joyce-farms.com/pages/naked-turkey). It’s Naked in that it isn’t brined. And it’s unfrozen, so I don’t have to waste time on thawing. If your turkey is frozen, you need to account for thawing time. So rewind this process by 24 hours for every 4 lbs of turkey. That is, if you have a 12 lb frozen turkey, you need to start thawing it 3 days prior to Monday. extrapolate as needed for whatever size turkey you have. Also, please note (again) that turkey fryers generally cannot support > an 18lb turkey; if you need more turkey, make two of them.
Tuesday
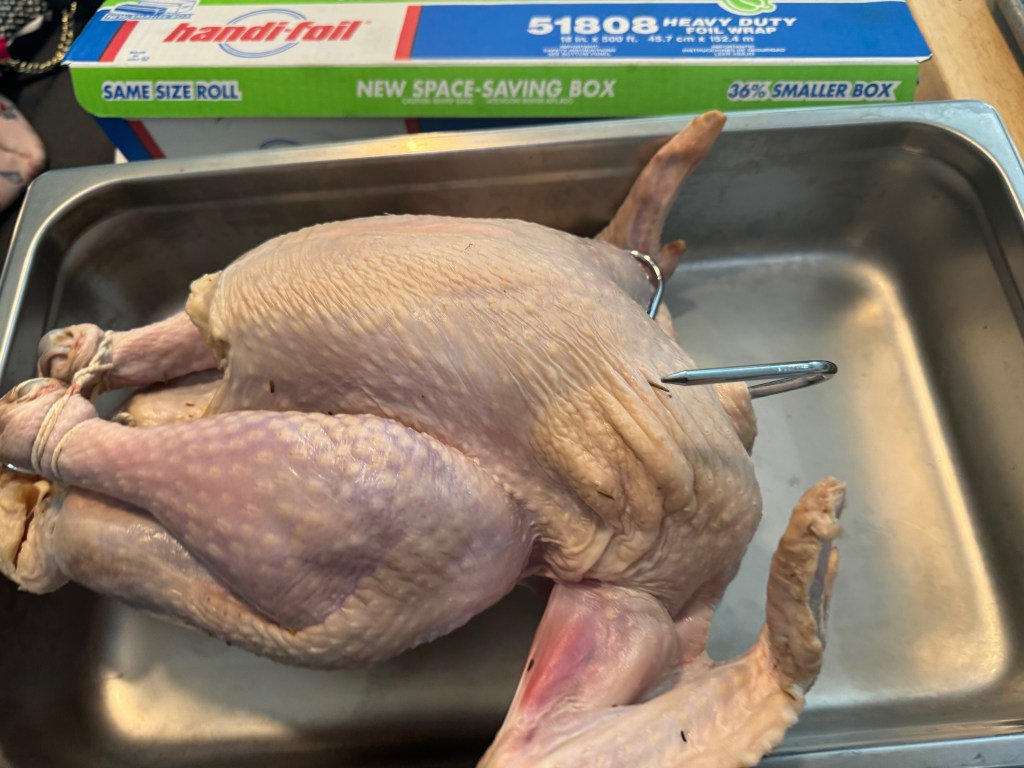
Unpack the turkey, reserve the innards for stock, and prepare to get it dressed up to go into the pot. Your fryer includes a rack & lifting hook kit, similar to the below.

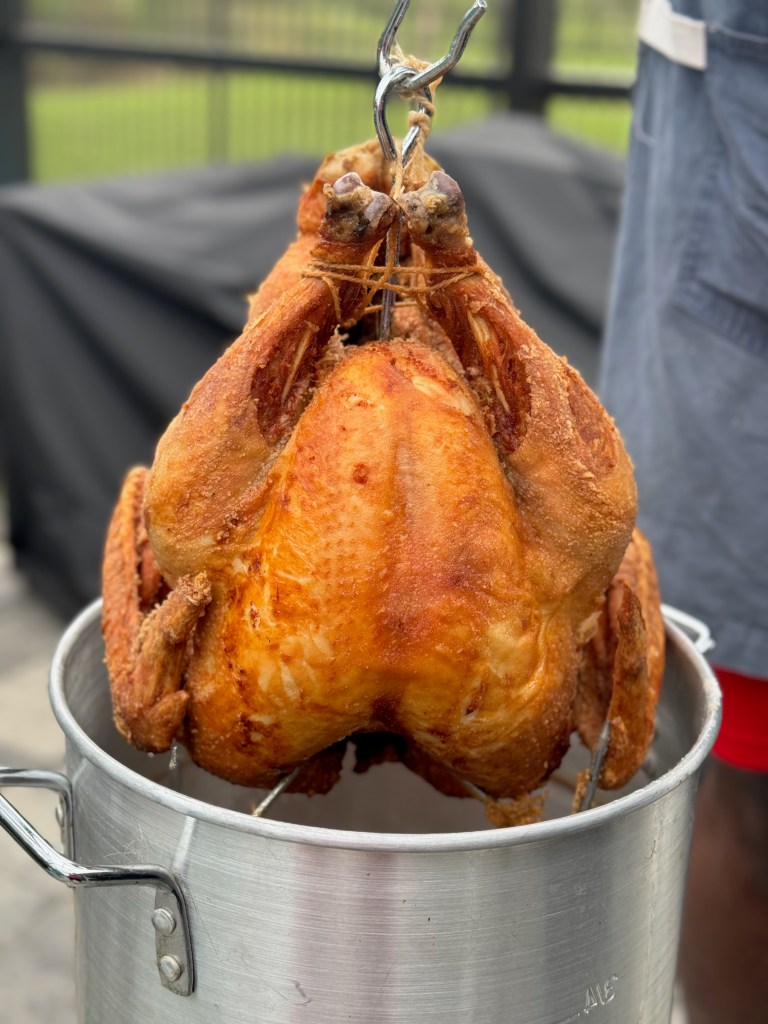
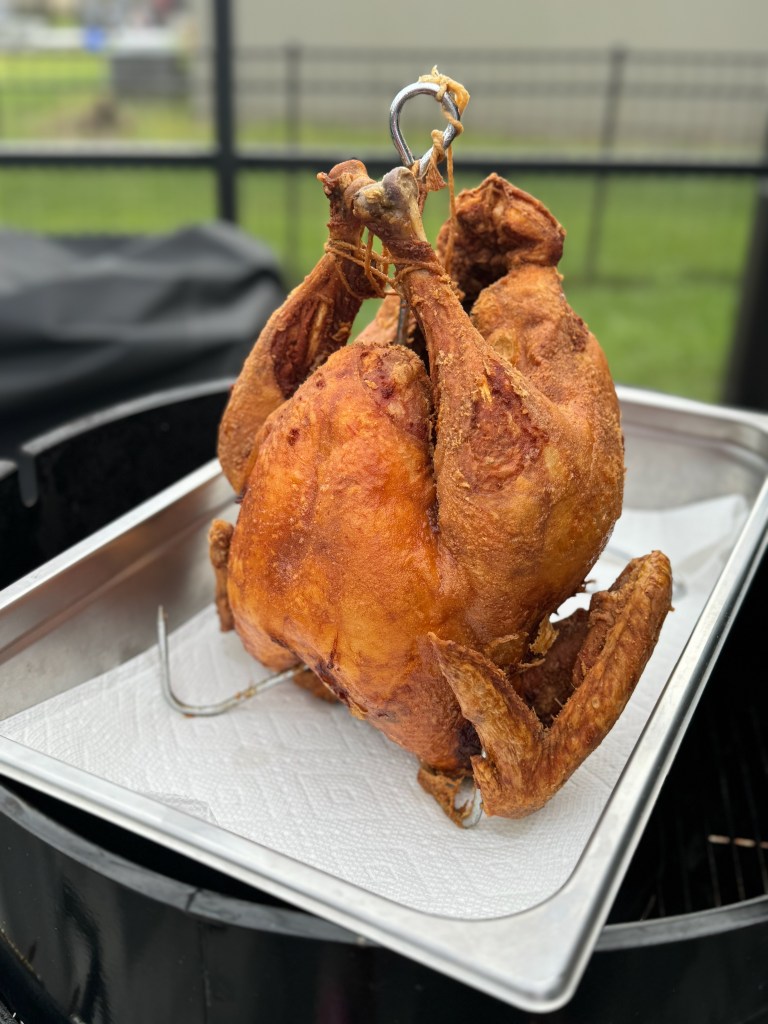
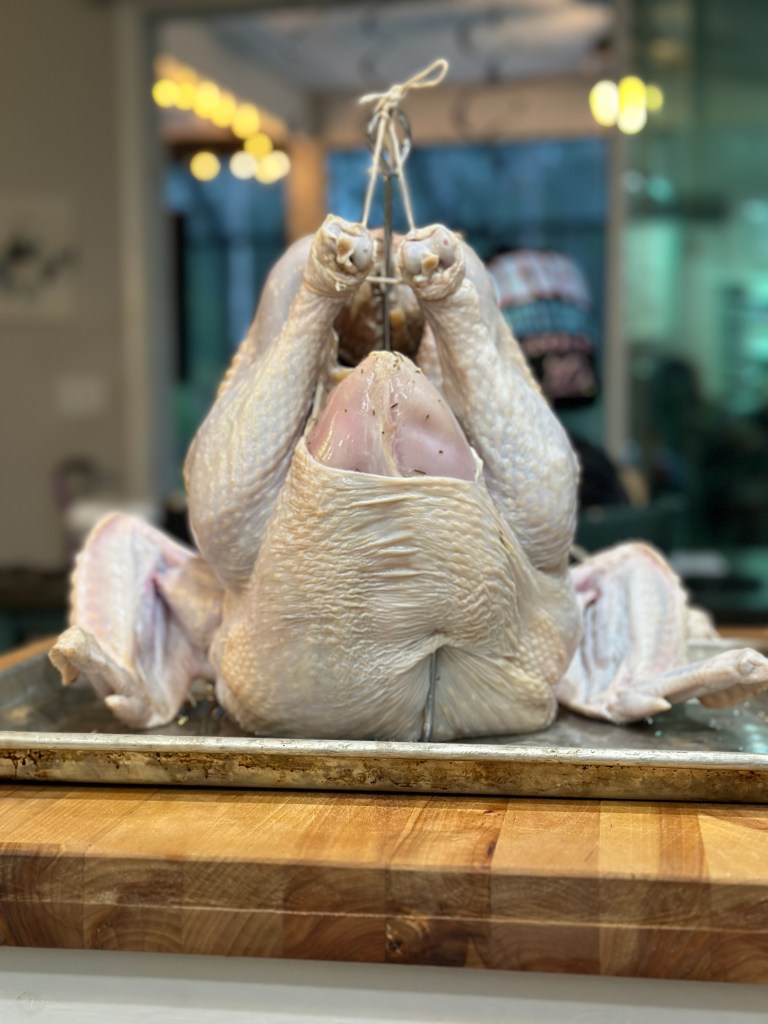
Place your turkey on the rack, breasts facing down, inserting the vertical portion in the cavity. Use the optional butcher twine to secure the turkey to keep the legs upright. This will assist with making it easier to get the turkey in and out of the fryer. You can fold over the wings if you like. I generally don’t. When done it should look similar to the following:
Next, place the raw turkey in the frying pot. Use the hook to grab the rack and do this. This is good practice because you are going to do this a lot during cooking. Fill the pot with water until the turkey is just covered with water. You should easily have 4-8 inches of room between the top of the water and the top of the pot. Then REMOVE the turkey. The level where the water is in the pot, THAT is how much oil you’ll need to add. Mark this location. (I use a wooden yardstick for this). This allows you to note how much oil you need to add and properly accounts for how much oil the mass of the turkey will displace. Dump the water, wash the pot, and fill with the oil of your choosing to the previously marked location.
Prepare the wet brine. I use this (https://www.williams-sonoma.com/products/williams-sonoma-autumn-fruit-and-spice-turkey-brine/,) but whatever you like works and brine the turkey under refrigeration for 12-24 hours. (I usually like to do 2 hours per pound and I aim for 10-14 lb birds). I use a Briner Bucket for my brining since it has a locking inner lid to keep the turkey submerged, but any food-safe bucket will do. In a pitch, a particularly large food-safe ZipLoc bag will work. (Yes, they make ZipLoc bags big enough to fit a turkey)
Wednesday
Remove the turkey from the brine, and rinse it thoroughly under cold water, both inside and outside. You wanna rinse off all of that salty brine. It’s ok, you got enough flavor into it. Next, dry off the exterior of the turkey with some paper towels. Put the turkey back into the fridge uncovered on a tray/pan, ideally in a vertical position so that it can get air on all sides. Use the rack that comes with your fryer to keep the bird….erect. We want to dry the exterior skin as much as we can before frying. I use a USB-C mini-fan to help here. Yes, I put a fan inside my fridge. TYVM Alton Brown.
Thursday
It’s go time. Get that turkey out of the fridge about an hour before you want to start cooking. Notice how much dryer the exterior skin is.
Spray the exterior with cooking spray and dust the exterior with lightly seasoned flour. (Again, we are trying to keep the exterior dry, and as a useful side effect, you get some crispier skin).
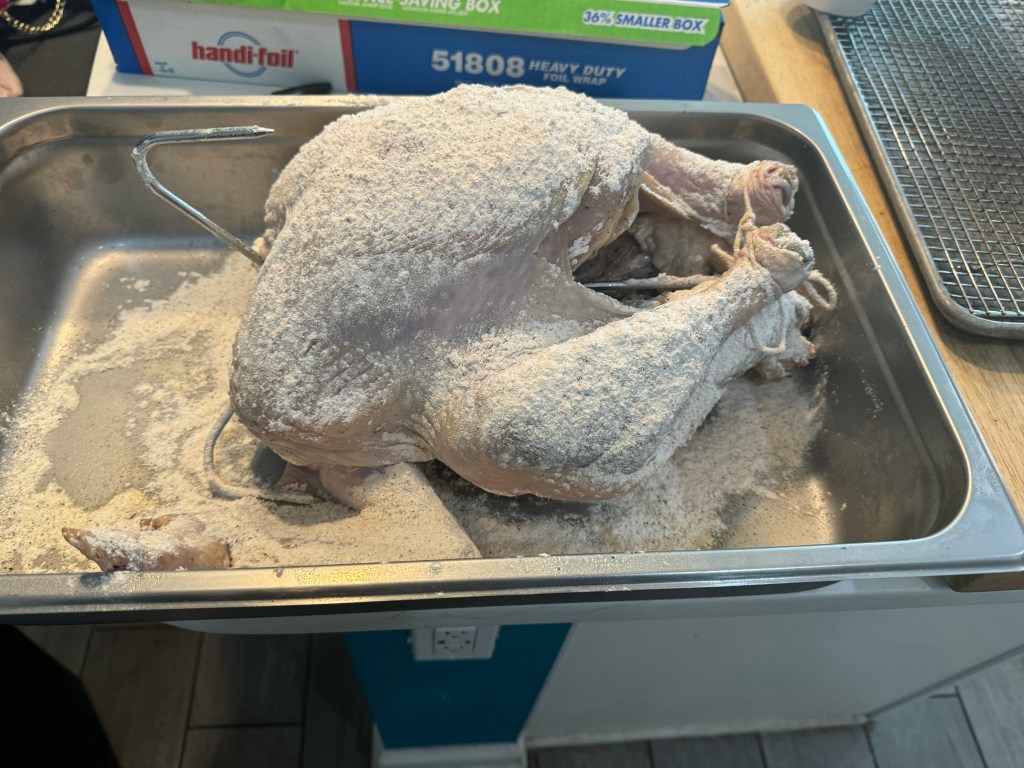
Stand it up, shake off the excess flour. Put it on the rack so that it can be lowered into the oil. You can truss the legs if you want. That’s optional. 30-45 minutes out, put away the small children, drunk relatives, and pets and fire up the fryer. Even with a 50K+ BTU burner, 3-5 gallons of oil is a LOT of mass to heat up. Once your oil is up to temp (I usually aim for 390-400 degrees (F) . Yes that’s kinda high, but your temps will drop precipitously once you add that “big ass bird”™ to it.), Turn off your fryer. Yes… KILL THE FLAME*
I say again – KILL THE FLAME – This protects you in the event of a boil-over, which you shouldn’t have because:
- You have the correct amount of oil in the pot. (Remember, we measured that above)
- The exterior of the bird is as dry as we can make it.
but still, belts and suspenders.
Remember this. Any time the turkey goes into or out of the fryer, KILL THE FLAME.
Next, put on your oven mitts. I recommend a rather long set of mitts here that cover your entire forearm. You are going to be extended over a hot pot lowering a bird and generating a fuckton of steam. Short gloves won’t do. Grab your bird, and slowly lower it into the oil. And I mean SLOWLY. It should feel comically slow. Remember the time you and the spouse experimented and did that thing? THAT SLOW. Like, if you aren’t thinking about how slow it is, you are moving too fast. It should take you between 45-90 seconds to get this bird in the oil. Steam displaces oil, and by lowering the bird super-duper slowly, you prevent a boilover by not having all the exterior moisture flash at the same time. It is still going to be a fairly vigorous bubbling action, but nothing that’s unsafe.
Now that the bird is in, relight your burners, and cook away. Your fryer pot has a lid; you don’t need it. Cook the bird uncovered. It should take you between 3-4 minutes per pound of turkey. And you’ll want to keep the oil in the 325-375 range. I start probing for temperature (165 in the breast; 175 in the thighs) at around the 30-35 minutes mark (assuming a 10-14 lb bird). And I’d check about every 4-5 minutes afterwards. I could use one of my probes to the Fireboard for this, but honestly, I don’t like having loose wires out while I have the fryer running. I’m clumsy.
When you are about 5-10 minutes from done, grab a pan, line it with some paper towels and prepare to pull Birdo from its bath. Alternatively a baking sheet with a wire rack is also valid.
Once you’ve hit temp, grab that sumbitch, put it in the aforementioned pan, let him chill for 15-20 minutes before cutting. Turn off the fryer. Light a stogie and bask in the bliss of a muthafucking fried turkey